Thursday, June 28, 2007

What is this bead?

Along with the glass lampwork beads that Liz sent me, she included this really large tear drop bead. I don't know what it is. It looks to me like it could be rhodonite. I would call it that, but the flipside is so different from the front, that I really don't know what it is at all (both are equally as beautiful). This is easily the largest bead that I have, measuring 1" across and 1 1/2" top to bottom and approximately 1/8" thick.
Here is the front (or what I call the front).

Here is the back (or what I call the back).

Wednesday, June 27, 2007

Mr. Wonky

My great friend Liz from Ontario made me this super sweet bead.
I hung it from my rearview mirror, so I can watch it fly while I am driving.
He has a ton of personality. His face is lopsided and he hangs funny.
I love him!


Liz also sent me these beads that she made. I love them all!

These are my two favorites.

Saturday, June 16, 2007

Crystal Cuff Bracelet


This is not finished, as it needs a clasp.
I am making this for a friend of Julie's who might like to purchase 4 of these for her bridesmaids.
I am not sure what kind of clasp I will use, whether I will make one, or use one that I purchased.

I am hoping to make another crazy bracelet like this by crocheting it. I think it will take a lot less time, and I can charge less.
This bracelet took me approximately 5 hours total already, I had to make it up as I went along, trying to copy a bracelet that Julie had, but making it more delicate.

The materials are sterling silver wire in 22ga for the structure and 24ga for the wraps, the beads are swarovski crystals in clear and AB, clear and silver lined #15 seed beads, and some silver lined triange beads.

Monday, June 04, 2007

Crocheted Carnelian and Garnet Necklace

I started this necklace on my vacation, although all I got done was stringing the beads until I had a 2 1/2 hour layover in Ohio...that prompted me to actually make it. Crocheted sterling silver wire with carnelian and garnet beads.
I love this type of necklace, I have made many of these in various gemstones.
This one is particularly delicate, it can be wrapped around a smallish wrist three times for a nice bracelet, too.

Friday, May 18, 2007

Pearl Bracelet

The bracelet on...

The total mess I made making it.

Thursday, May 10, 2007

Embellished Matchbox

This coffin is made from a rectangular matchbox.
I covered it with black textured matboard paper (stripped off of a mat scrap). The flowers are also stripped matboard coiled into flowers, and cut out leaves.
The handles of the coffin are made from aluminum wire.

I found the head from a small toy, and x'ed out the eyes, for a comic effect.

I made this for a challenge on the forum, it is not due until May 15th, but I just couldn't resist posting it here.

Wednesday, May 09, 2007

Stacking Rings

I made these simple stacking rings for Julie.
She saw one I made for myself and wanted 5 of them. I only had enough of the correct size stock to make 4 so that is what she is getting.


These were pretty easy to make, but if I had the proper soldering set up they would have been a lot easier. I really need to get a hose and needle tip for my propane torch. The butane torch really doesn't get hot enough for a good solder.

I also tested the size by trying on a ring of hers and comparing fingers. That isn't the preferred way of sizing, so I hope they fit.

Here they are in action on my old wrinkly finger.

Sunday, May 06, 2007

Weathered Metal Technique


I used nashua foil tape. Cut pieces of tape crumbled up, then straightened out and taped in place. The first picture I used a waterbased extending medium with acrylic paints. The second picture I used Matte varnish to extend the acrylic paint. The second one has only one layer of paint so far.

Saturday, April 28, 2007

The Self Image

I have been in an altered book swap with some friends of mine, but the going has been slow, so I decided to start my own book. It's hard to get any instant satisfaction when your book is traveling across the country in a zig zag.

This book is one that I started myself for no reason other than boredom and the need to alter a book.

I found this great self help book at the antique store, it was only one dollar and the chapter titles are worth three times that price. I tried to use the book's own words to tell a story. These are the first spreads in the book, but is is far from done.


Flower Necklace

Today was the last class, I am sad.
I made some more of the hammered soldered rings to finish my necklace, and then attached the whole thing together with oval jumprings. I made a simple toggle for the clasp.


I found out today that we have access to the workshop for the entire day next saturday. I am very pleased about that.

I bought some gorgeous labradorite beads today with my christmas gift certificate. I can't believe it took me so long to use it.

Monday, April 16, 2007

Bezel set ring

I am late in posting this week.
On Saturday, we had bezel setting demos.
I decided I had to try it while the information was fresh in my thoughts. So, instead of finishing the flower necklace, I made this ring. I will finish the necklace this week.
This stone is an intersting combination of turquoise and I think green aventurine and amethyst. Feel free to correct me, as my guess is uneducated, I made this determination purely from the colors and texture of the stone.
I really want to join my local rock hound club...if there is such a thing.

I cut the shank out of 18ga silver sheet and sweat soldered it to my bezel which I made from 1/8in bezel wire and 24ga sheet for the bottom.
My last soldering, which was easy solder, seemed to make the solder joint on the bezel recede (I knew this could happen, but this was my first experience with it). I used hard solder on the bezel wire and medium solder to attach it to the base, then easy solder to attach the shank to the box bezel.

I worked on this ring for 4 1/2 hours and the stone is still loose. I really wanted to get it secure, but I was running out of time, and I don't have a bezel pusher at home. Maybe I can find something around the house that will do the trick.
I wore this ring all saturday night and all day sunday, and the stone is still in, just loose.

Saturday, April 07, 2007

Tube setting finally

Before I started to drill and set my stones into the flowers, I made a practice pendant. I worked so long already on the flowers that screwing them up in this final process would have been devastating to me.
This is a topaz of some sort, 6mm stone and one of the rings I had previously made. I soldered the tube setting to a back piece, and sawed and filed for a smooth finish. I soldered the filed tube setting to the inside of the ring. Then I sucessfully set the stone! YAY!

I really like this little pendant, I think I will just string it on a chain right through the ring.

I drilled out the middle of the flower with a burr bit, which proved to be quite a challenge. The soldered wire behaves nothing like sheet, that's for sure. Then I filed inside the hole until the tube fit into it snuggly on all joints. I soldered the tubes in place, and then off I was to the drill press.

Burring out the center of the tube is very picky, too. I started with smaller burr bits than I needed and worked my way to a larger size three times. It is easy to overdo it.

You can see in the close up that I could have done a neater job, but it was harder than I thought.

Next week we will do bezel setting.

Monday, April 02, 2007

My page in Cammy's book

Cammy was the first to work on my book, and now I finally worked on hers.
I did a spread in Cammy's book.
I hope she likes it.
It doesn't make much sense, but it was really fun to do.


My page in Leah's book

It has been a very long time since I received a book to work on. Last friday I got two in the mail.
This is Leah's book.
I call this 'Leah and her Ladybugs'.

Saturday, March 31, 2007

Flower necklace progress

Today we got tube and flush setting demontrations.
I made two more flowers both a bit smaller than the center flower. I also cut the tube for the cubic zirconias. Red in the center and clear on the sides. I will have to wait until next saturday to set them, as I still have to drill out the inside for the stone to sit. I also still have to file out a base in the center of the flowers and solder the tubes in place.
The flowers have been hammered flatter at the bend, still round at the center.
I don't know how far up the sides I will take the rings, I may just use 4 like the picture and use leather cord or a smaller chain for the rest.
I don't know...tune in next week and find out.


Here is a different angle (to view the tubes) and different set up. I had taken this picture at school.

Saturday, March 24, 2007

Flowers flowers everywhere

I really missed class last saturday. It seemed like an eternity between classes.

Back on track now.
Today I oxidized my petal ring with LOS and then polished it on the wheel. I couldn't get a great picture of it, the light was messing with the shininess.


I think I see myself in there...Heehee

Then I got to my next project, soldering. I cut these petals out of 14 gauge silver wire and then filed them so that they would have a nice fit. This took a long time. The soldering I did all at once. I made sure that the pieces were butting up against each other neatly, and then fluxed the whole piece and layed tiny pallions of solder on each of the five joints and heated until the flow. Very exciting!

This is a sneak peek of what I plan to do with this very 60's style pendant. I will make another of the curly bail thingy for the other side of the pendant, and solder those on. I plan to tube set the ruby in the center of the flower. I will either set it on top of the center, or carefully file out the exact fit of the tube in order to sink the setting a bit.


I stayed after class and made these five soldered rings, they are 18 gauge and hammered. Totally groovy links! I don't know what to do with only five of them, so I'll have to make more so I can have a chain. These are a bit smaller in diameter than a dime. I used a sharpie to coil the wire around and cut the rings with a saw.


Wednesday, March 14, 2007

Semi Truck + Power lines = chaos

I had a most surreal experience on my ride to work today.
I was driving the route I always take, a short boring ride through the neighborhoods of Norwood. As I approached the stop sign next to the post office, I noticed a semi truck one car ahead, slowly driving into the opposite lane to take a huge swing of a right hand turn. I had never seen a Semi on this road, nor do I think I should have. I came to a stop behind the car waiting for the semi to turn.

The semi took the right turn along with the cables that power half of downtown Norwood.

This next part is extremely hard to explain, it was in slow motion, right out of a movie. The power lines that clung to the front of the top of the semi truck began to bungee wildly back and forth, up and down, and a few of them began to snap and spark. My eyes were everywhere, watching the lines all around me, slowly coming towards me and then reversing direction and soaring till they were well beyond where they originated. They went back and forth until the driver ahead of me gunned his car to avoid the lash, and I followed.

I gassed the car so fast, and blew the stop sign, taking a left to avoid the pole just ahead that was swaying back and forth menacingly. I guess I thought getting in a car accident would be less troubling to me than getting lashed with live wires. Thankfully neither happened.

I arrived at work very shaky but safe, and had to calm down a bit before my hands were steady.

Saturday, March 10, 2007

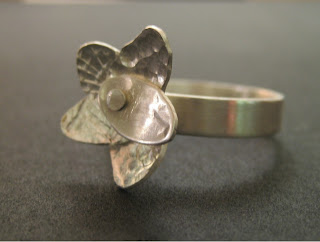
Petal Ring

I completed my petal ring this morning.
I should have waited for some guidance, since I started to rivet the whole thing together before I spoke to the instructor about it, and now the petals are immobile.
You live and learn. I did get some tips on how to achieve this, but too late for this ring.
I still like the ring a lot, so no harm done.


After I completed the ring, we had demonstrations on a bunch of ways to solder. The demos took almost the entire class. The last 1/2 hour of class, I practiced soldering with some scrap copper. I sweat soldered some sheet scraps to a square piece of copper, and then soldered some wire onto the square as well. It wasn't any kind of design that I am proud of... it was just for practice, so I didn't take pics.

We will start on Project 3 in two weeks since next Saturday is spring break. I have two weeks to come up with a design that incorporates soldering sheet and wire, with any processes we have learned up to this point. I better put on my thinking cap.

Sunday, March 04, 2007

Picture Frame pendant

I have had a busy weekend, I couldn't post yesterday's work until now.

I finished the picture frame pendant. I cut out a tiny picture, and recycled a piece of plastic packaging to use as the 'glass'.

The whole copper, paper, and plastic sandwich is riveted in the center on either side, and one rivet in the center on the bottom.


Since my regular instructor was back, I got back to my ring after finishing the pendant.


I soldered on the post for the rivet, I still need to polish the ring to a high shine before adding the petals and riveting it all together.


I am going to finish the polishing at home this week and complete the ring next saturday.

Saturday, February 24, 2007

Project 2: take two

I really wanted to work on the ring today, unfortunately we had a substitute teacher who really didn't see my vision. As I showed her the project I was working on, she continuously made comments on how I should have done this or that first, and that this or that wouldn't work. I don't mean to say she was negative, but she clearly couldn't grasp the design. So instead of confusing myself and the substitute, I decided to start on something else and save the ring for my instructor who can envision the finished ring as I do.

I encouraged the sub to go through my sketches, and we chose this picture frame pendant. I initially wanted to make this pendant with tubes and rivets so as to have a space in between to change out a small photo. This version, however, will be a picture permanent in the frame, sandwiched between two pieces of copper, with a piece of thin plastic over the top of the picture.

I plan to search for a picture to include in this frame tomorrow. I am thinking of an impressionistic floral painting or something like that.


The side view... since this project needed to be formed and textured, I formed the sides slightly outward and the corners more so. The rivets will come into play once I find an appropriate image to incorporate. As it stands right now, I plan to rivet only the center of the two sides and the bottom. I initially wanted to rivet through the bail as well, but I formed the tip into a leaf and I realize that a rivet will just destroy the look of it.

So, this is what I did today in class. Next week I hope to finish this pendant and my ring that can't be done....yeah, we'll see.